
Introduction
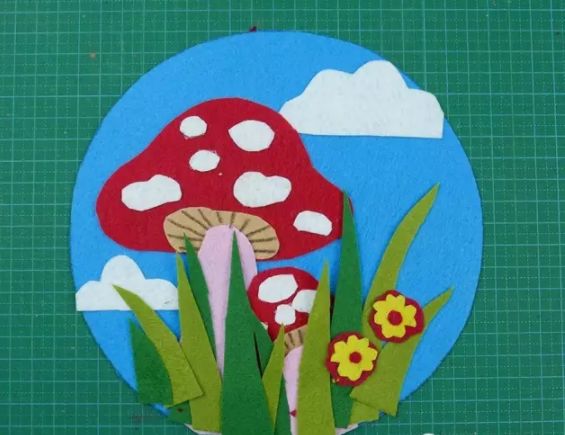
Cute little mushrooms have become essential decorations in various micro-landscapes, green plants, and models. Round heads, round bodies, and bright colors make them very eye-catching in micro-landscapes. Using crepe paper, you can create extremely realistic and beautiful mushroom models by hand. These DIY mushrooms don't require you to spend time cultivating and caring for them - they'll quietly and perfectly decorate your micro-landscape!
Today I'll teach you a completely different style of handmade paper art mushrooms. This handmade mushroom craft is very artistic!
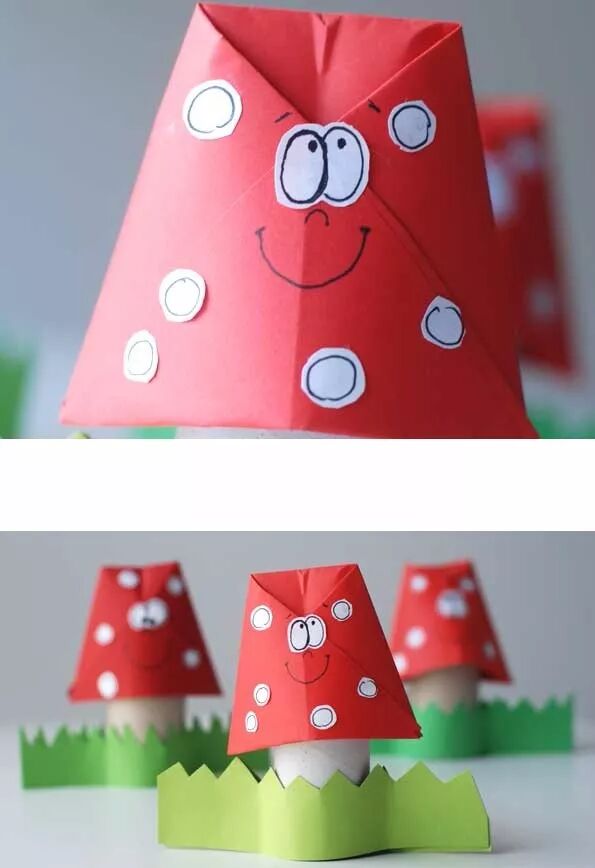
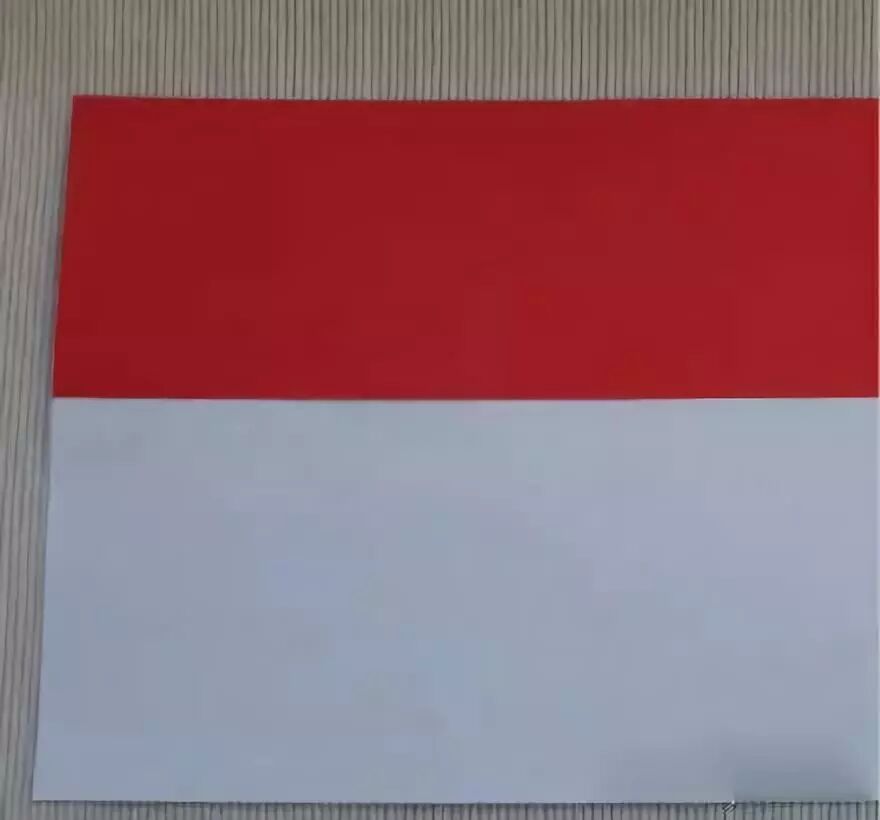
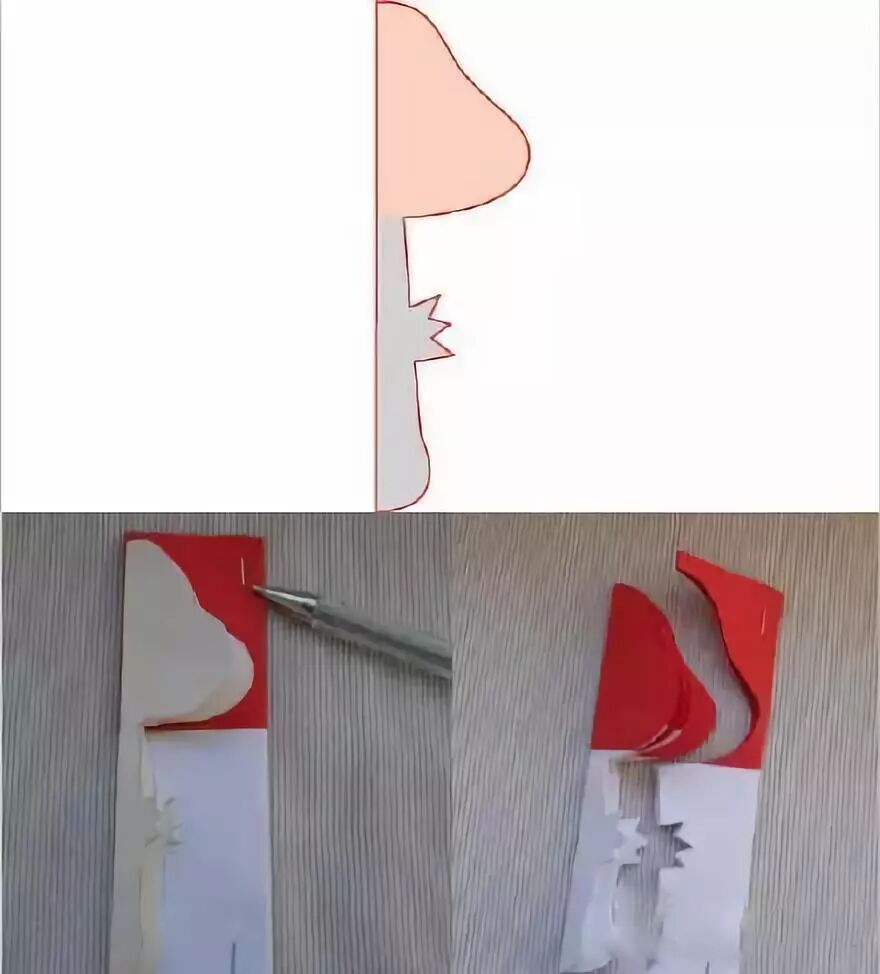
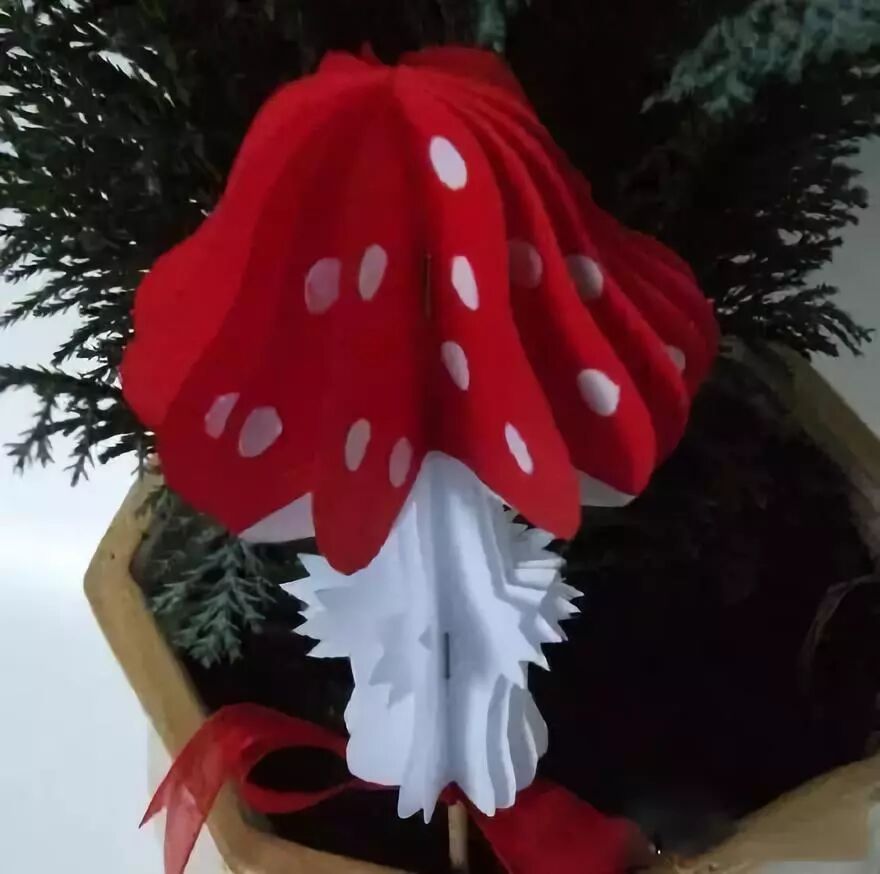
Toilet Paper Roll Mushroom
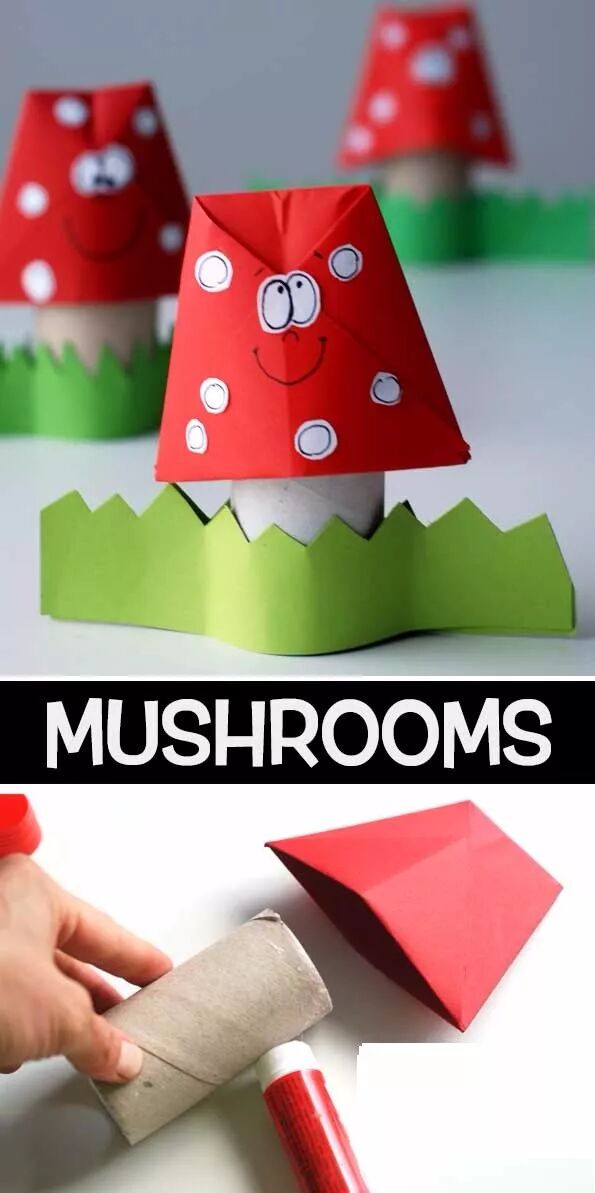
Materials needed: Toilet paper rolls, scissors, cardstock, solid glue, pens
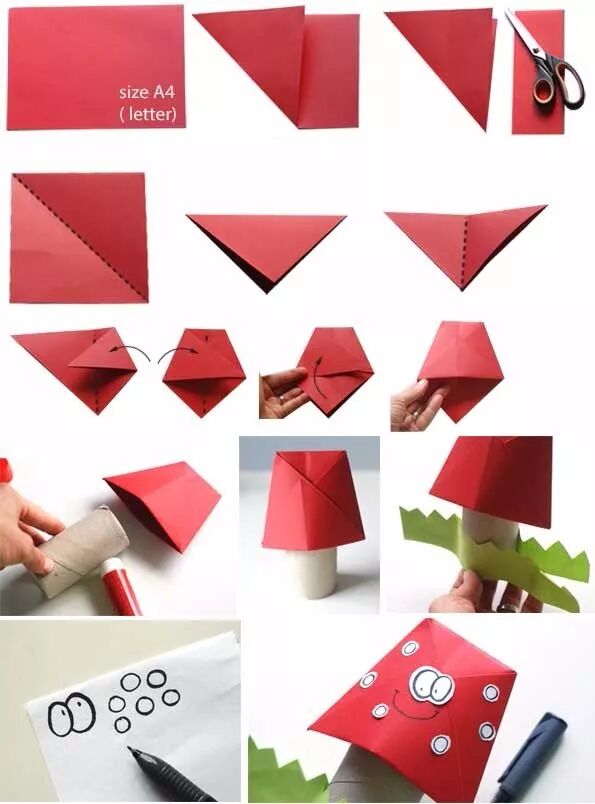
Instructions: See the diagram below
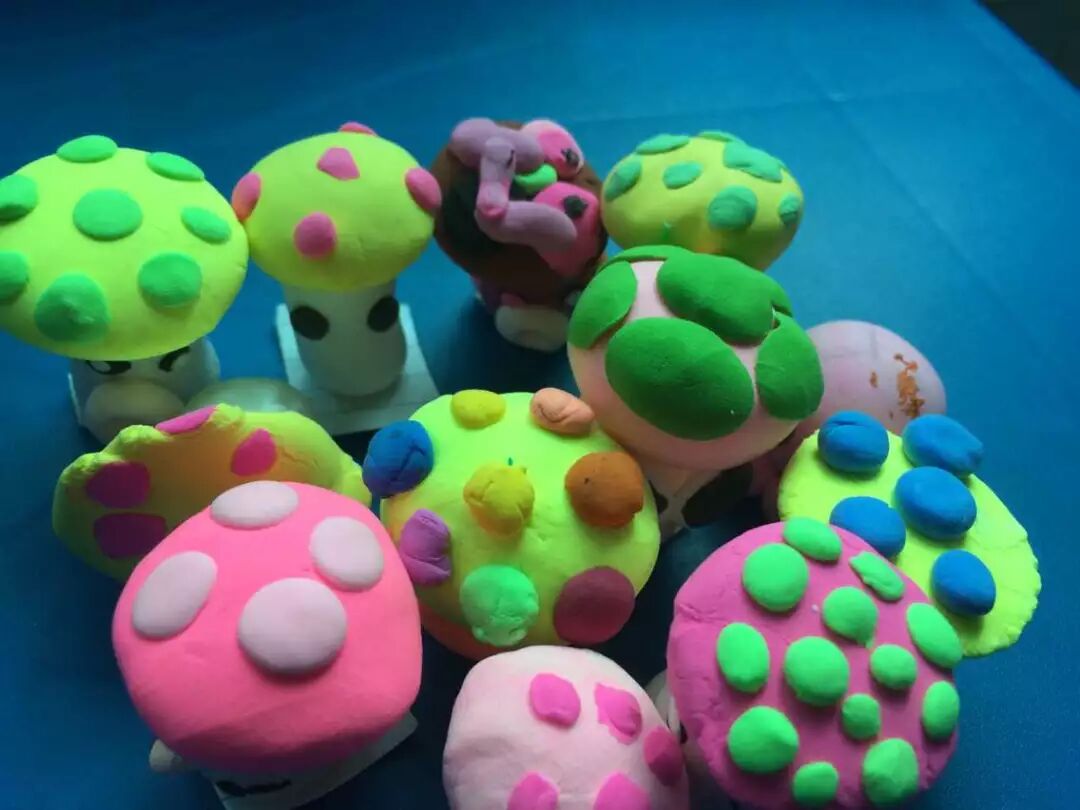
Clay Mushroom Dwarf
Materials needed: Clay in various colors
Instructions: See the diagram below
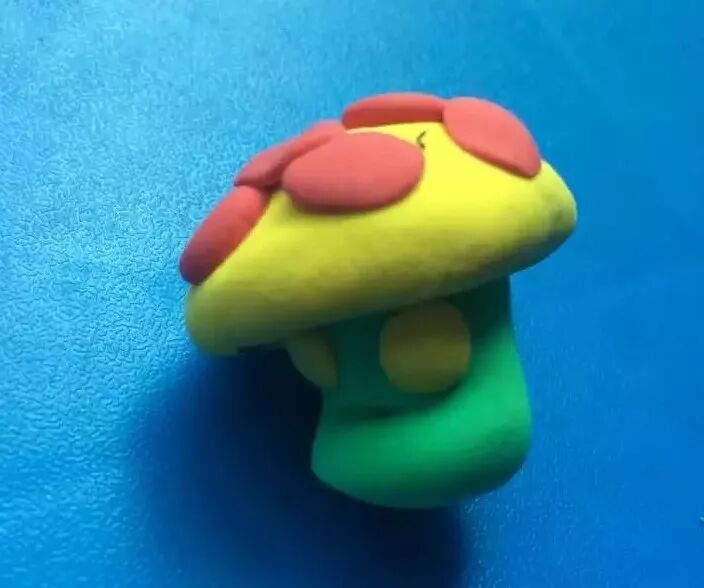
Lonely Mushroom
Materials needed: Clay in various colors
Instructions: See the diagram below
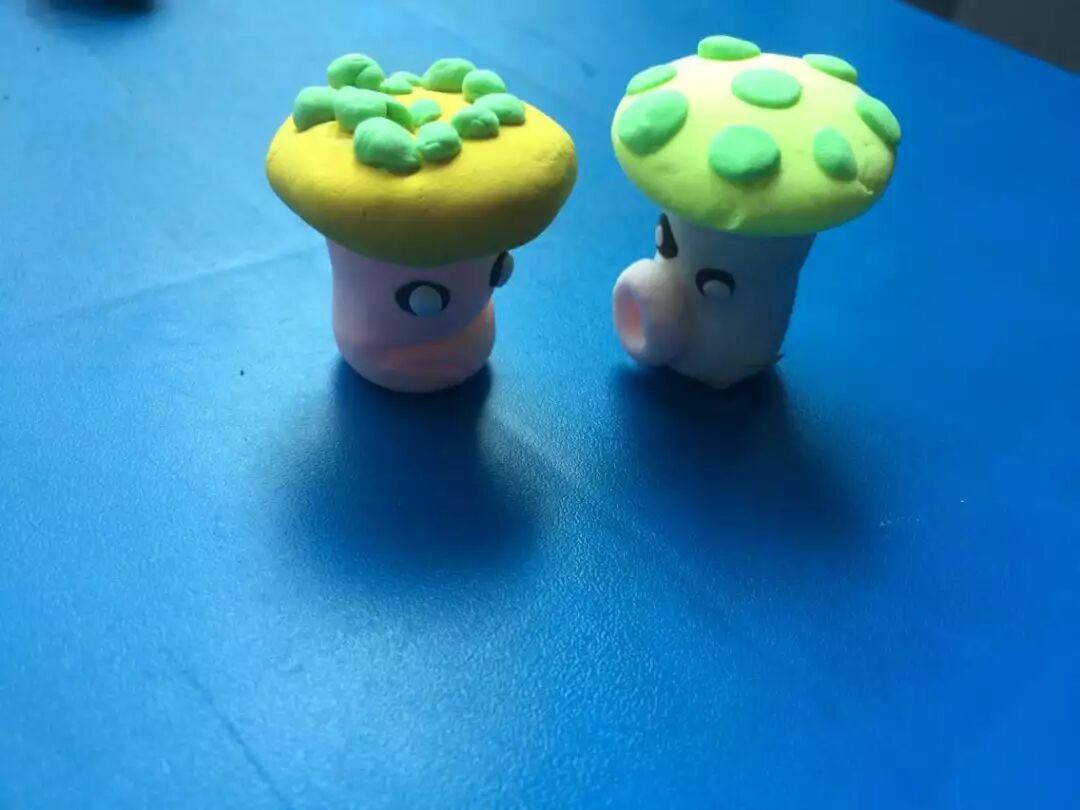
Let's Be Friends!
Materials needed: Clay in various colors
Instructions: See the diagram below
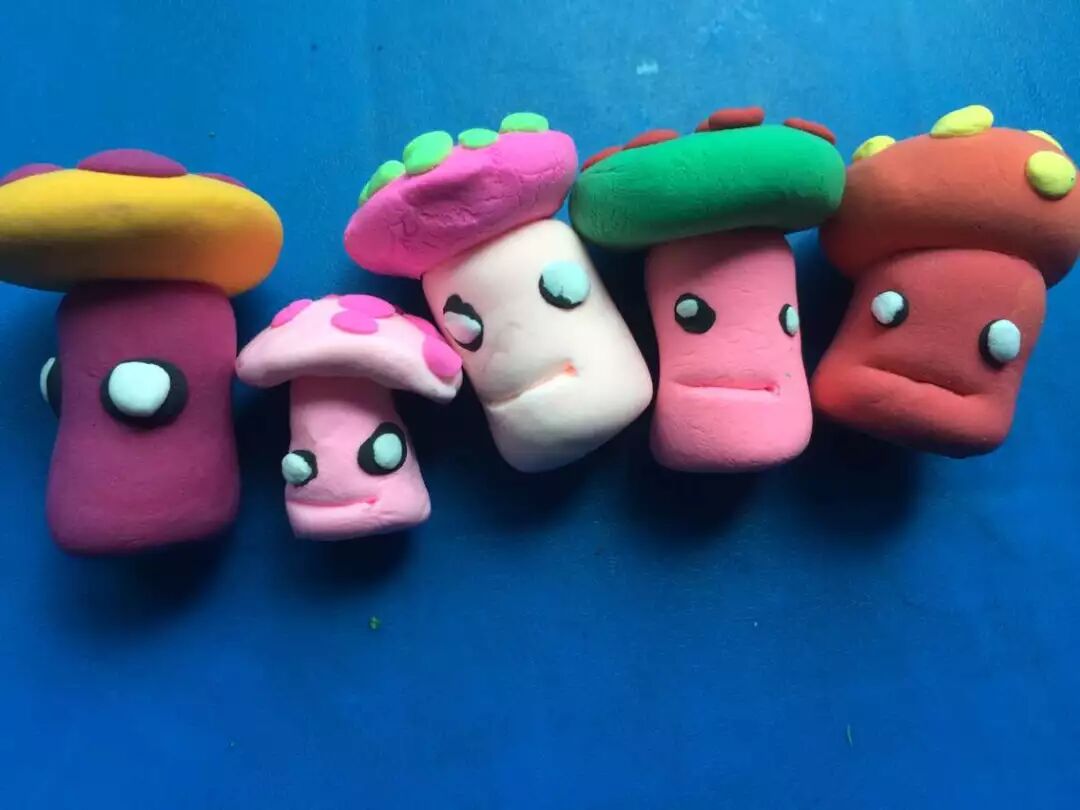
Mushroom Meeting
Materials needed: Clay in various colors
Instructions: See the diagram below
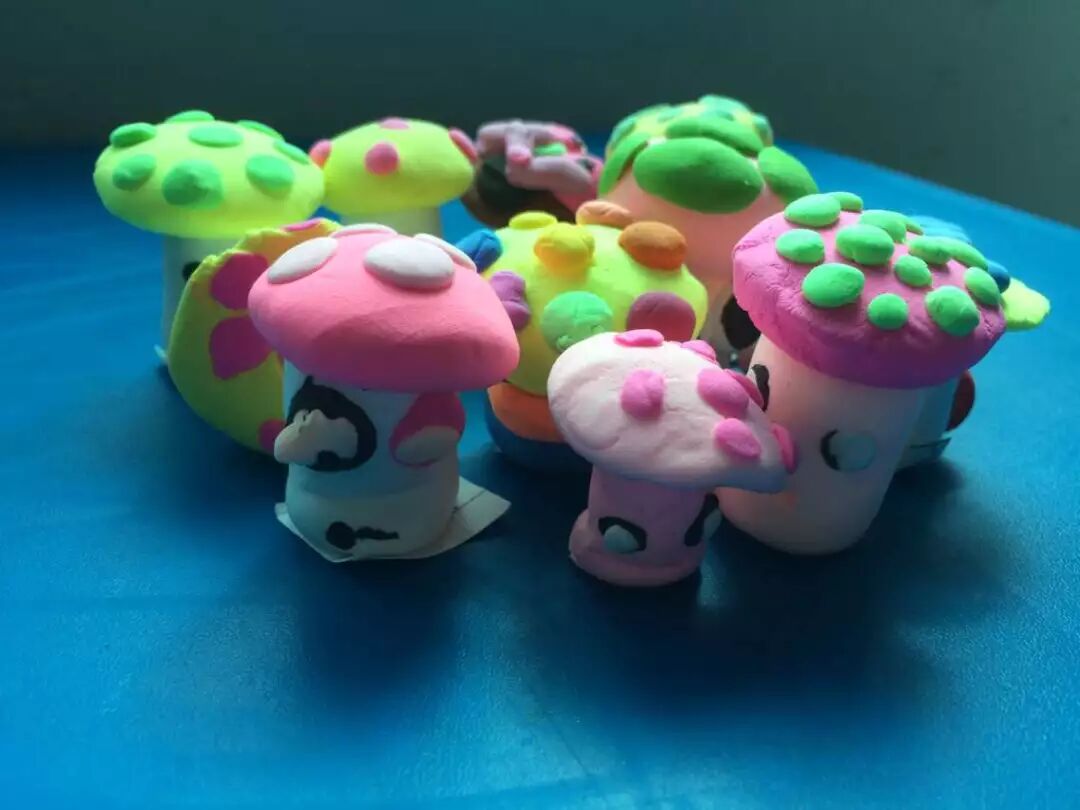
Best Friends Forever
Materials needed: Clay in various colors
Instructions: See the diagram below
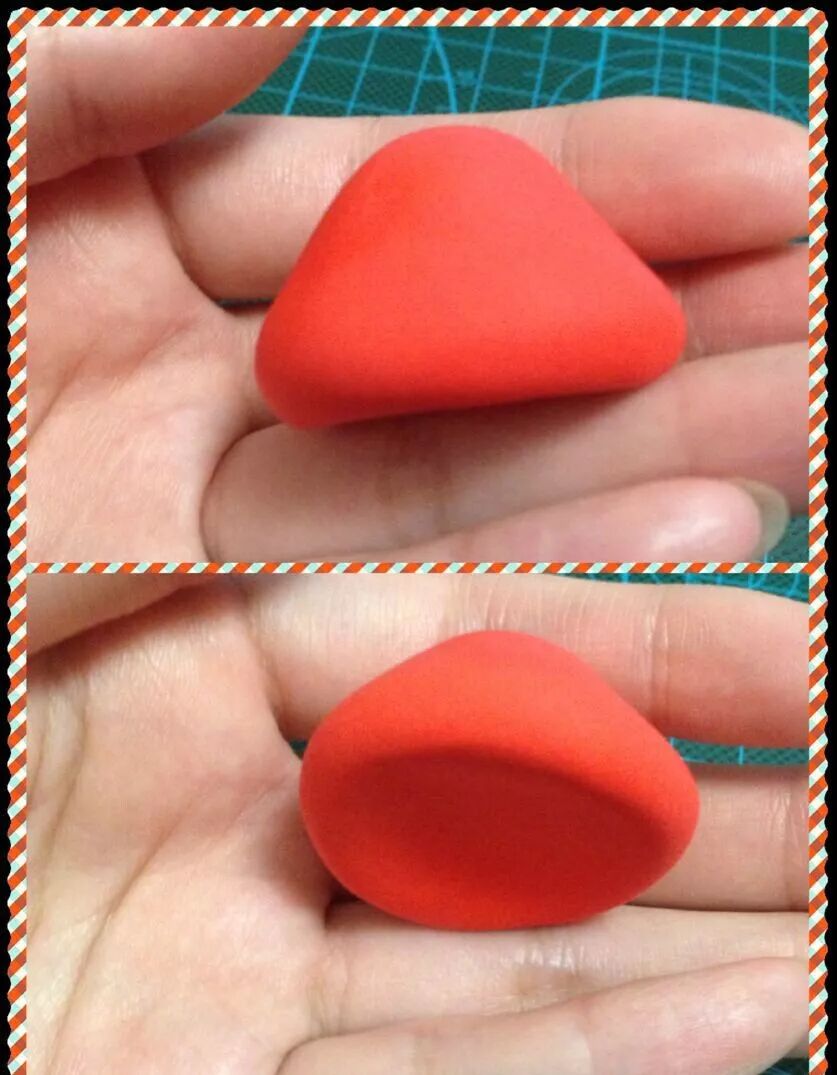
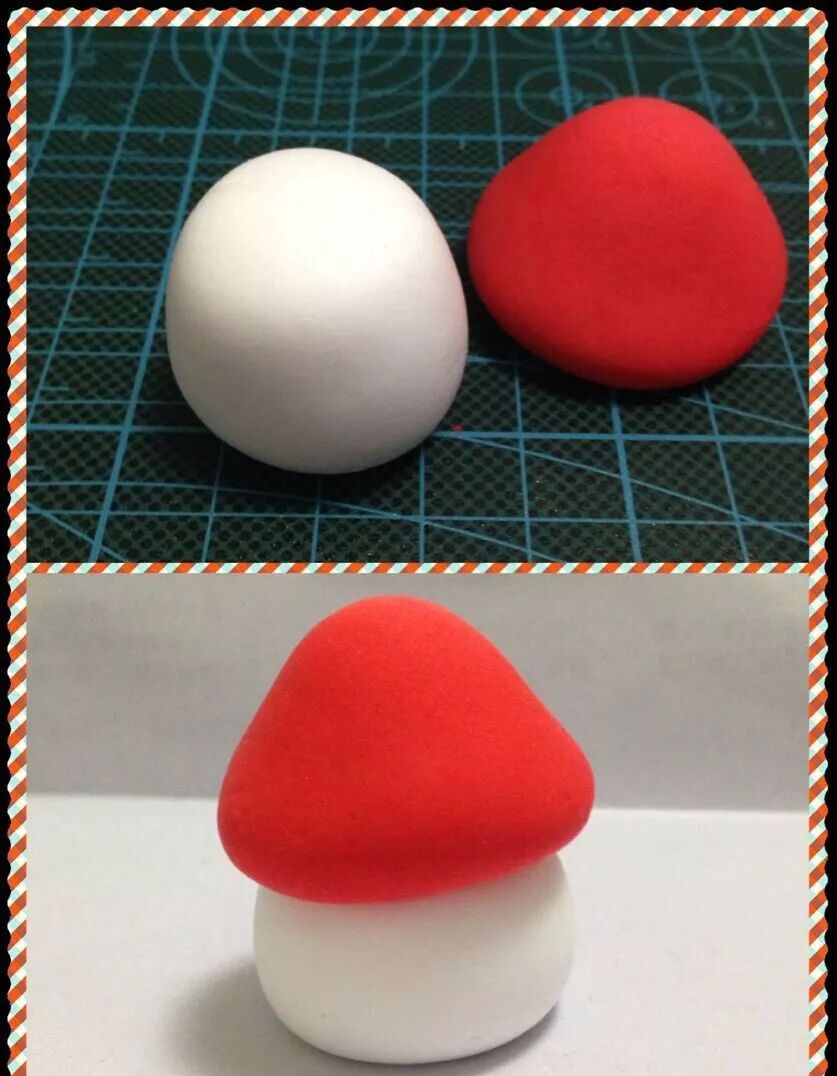
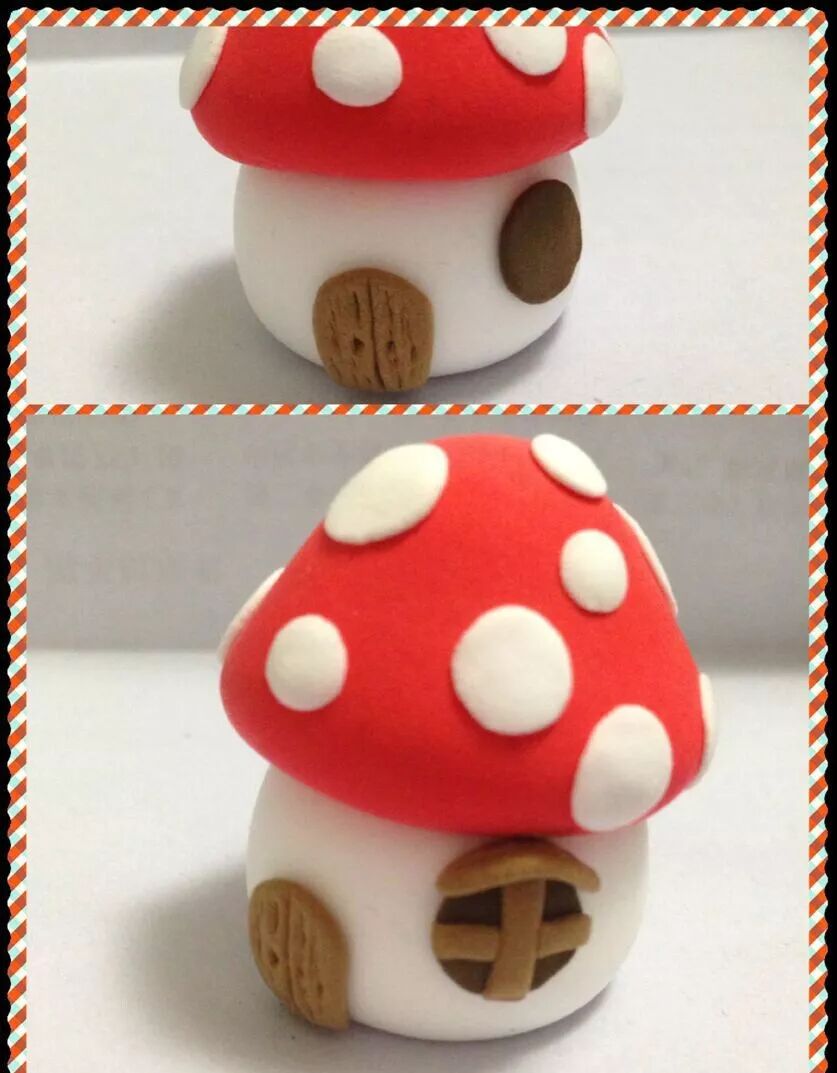
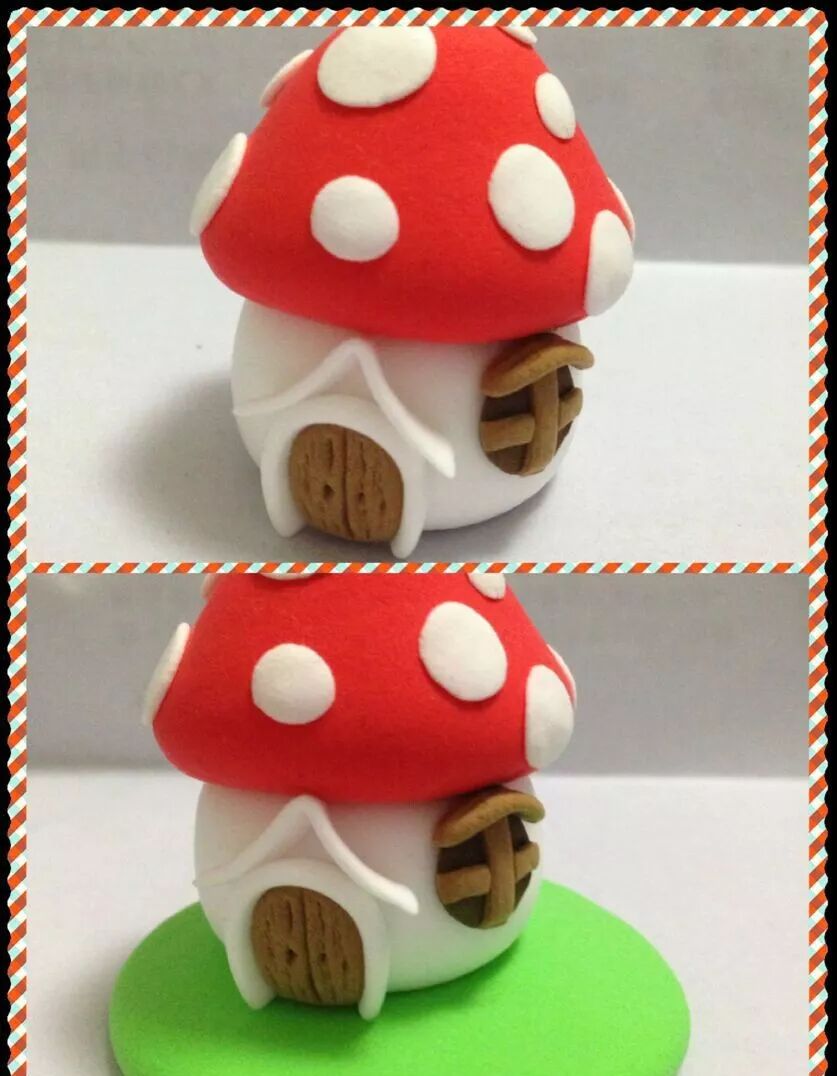
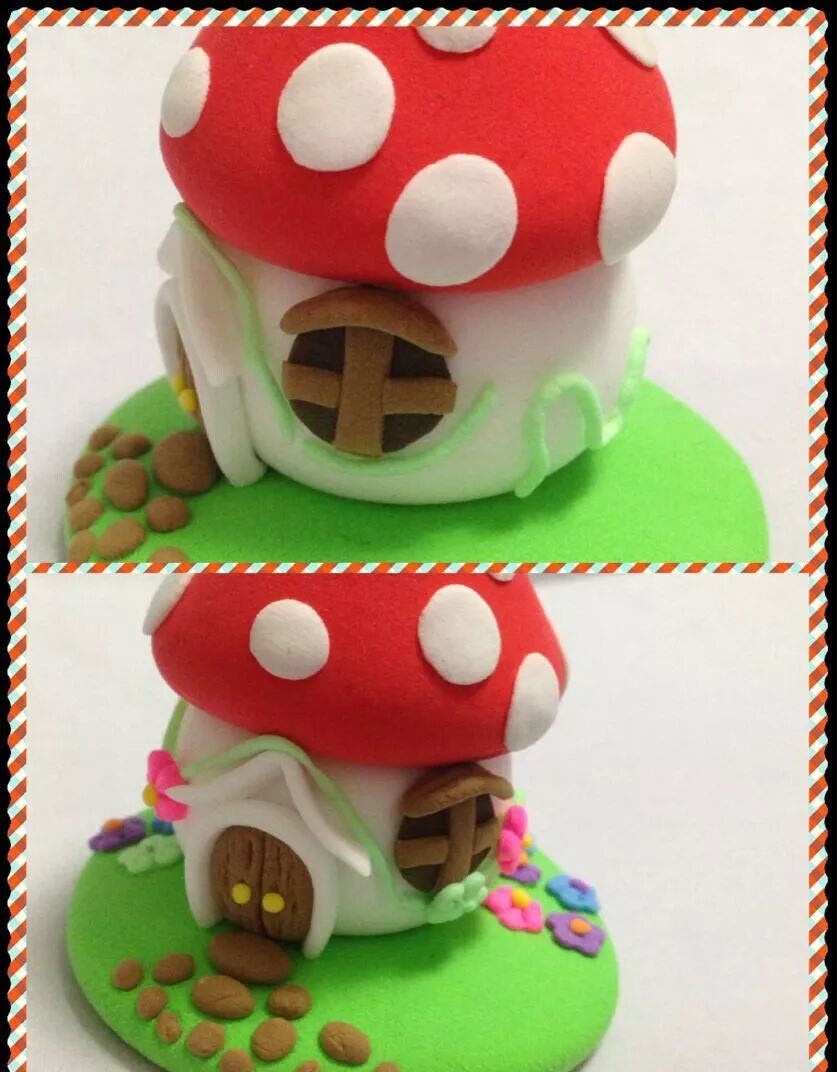
Clay Mushroom House
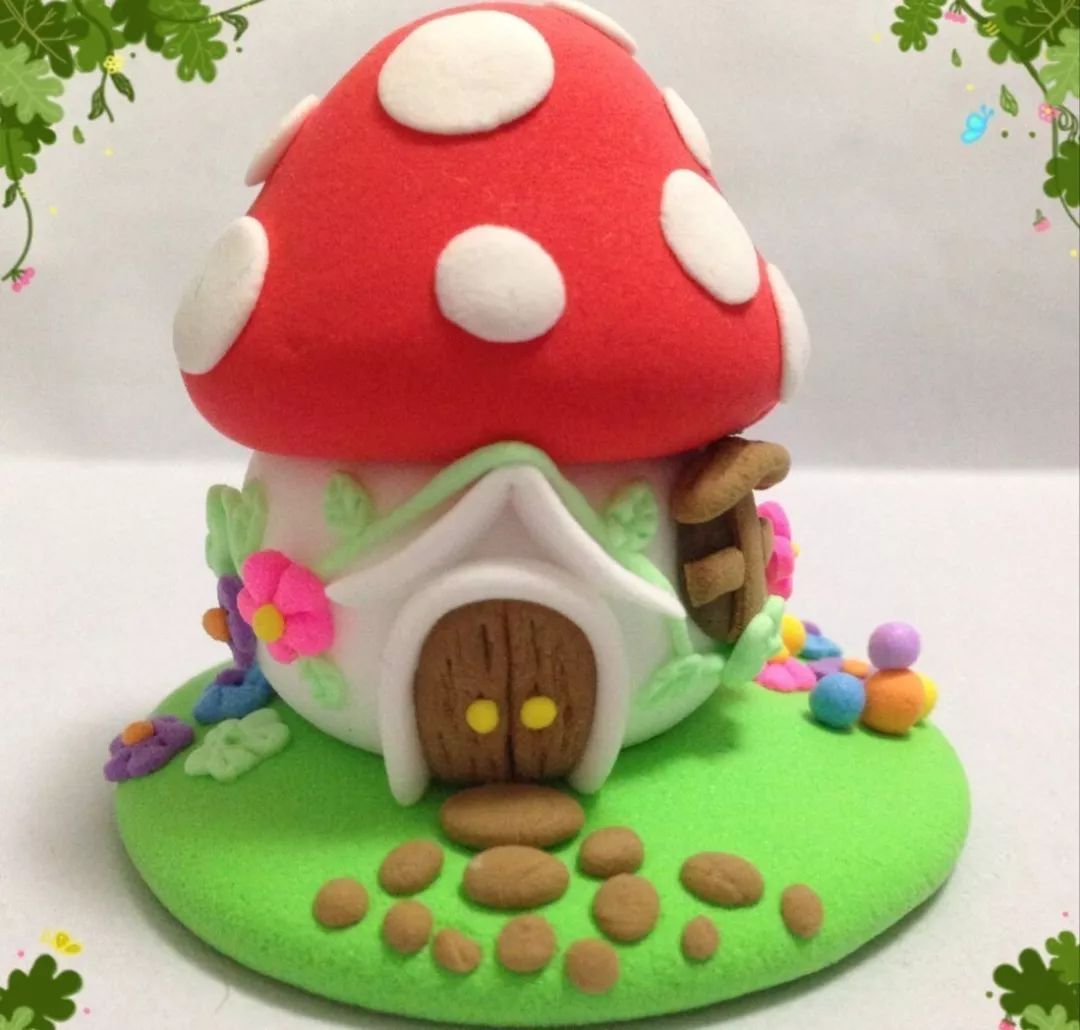
Mushroom house from fairy tales. I remember in the Smurfs, they all lived in these little houses, so cute!
Materials needed: White, black, flesh color, orange, yellow, dark brown, and light brown clay
Instructions:
- Take a piece of red clay and shape it into an umbrella shape as shown in the picture
- Roll a circle with white clay, press it slightly, then press it onto the top of the mushroom
- Press again to adjust the overall shape of the house
- Make several white circles and paste them on the roof
- Use coffee color for the door, draw wood grain lines on it
- Use dark brown for windows, window frames, and the eaves above the windows also use coffee color
- Surround the door with white strips to make a door frame, fold a white strip into a corner above to make a door eave, then paste it
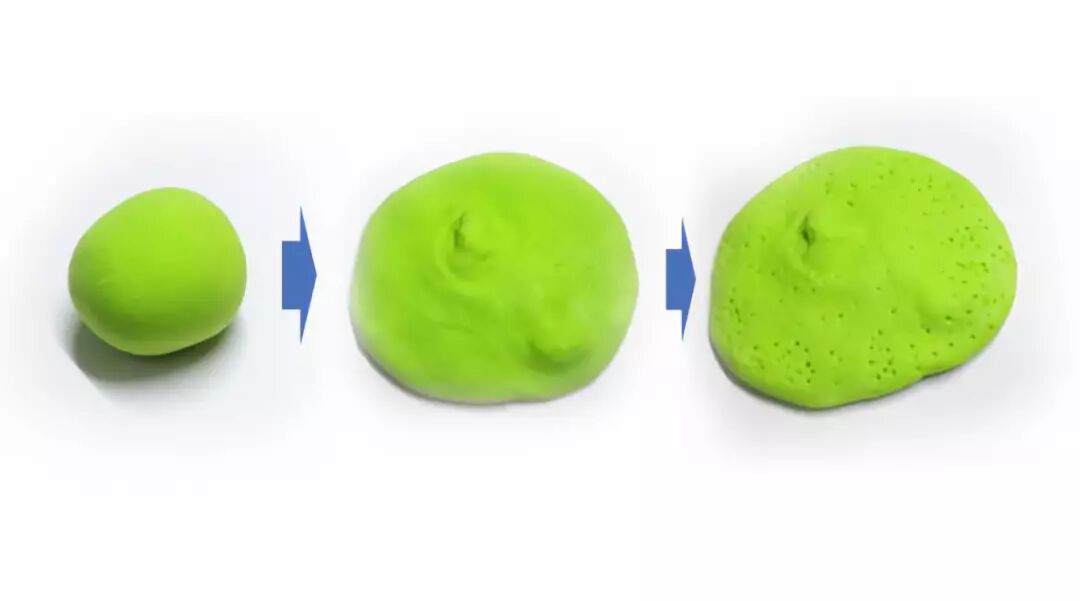
- Use green clay to roll into a circle and press flat to make the grass
- Use light green clay to roll into thin strips and paste them randomly around the door and windows to become vines
- Then make several flowers and leaves of various colors and paste them randomly beside the house
- Don't forget to glue two yellow circles on the wooden door as handles
- Once everything is in place, the house is complete!
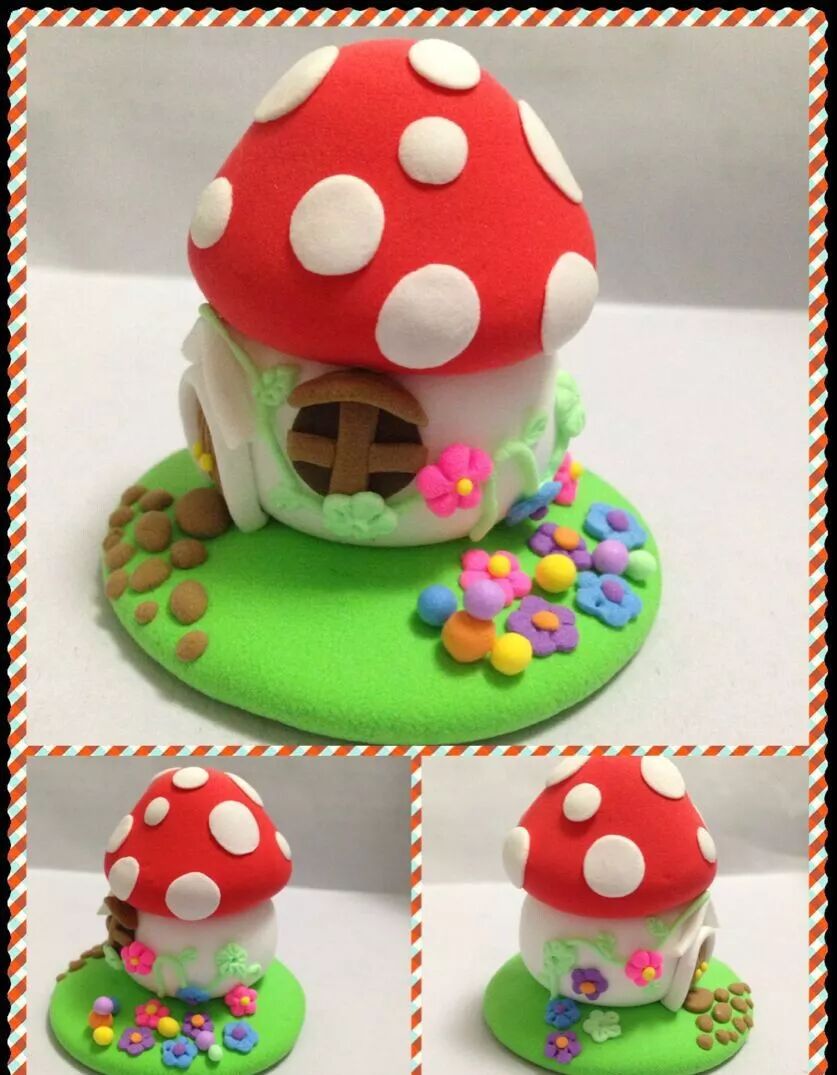
Isn't it very cute? Let's make it!
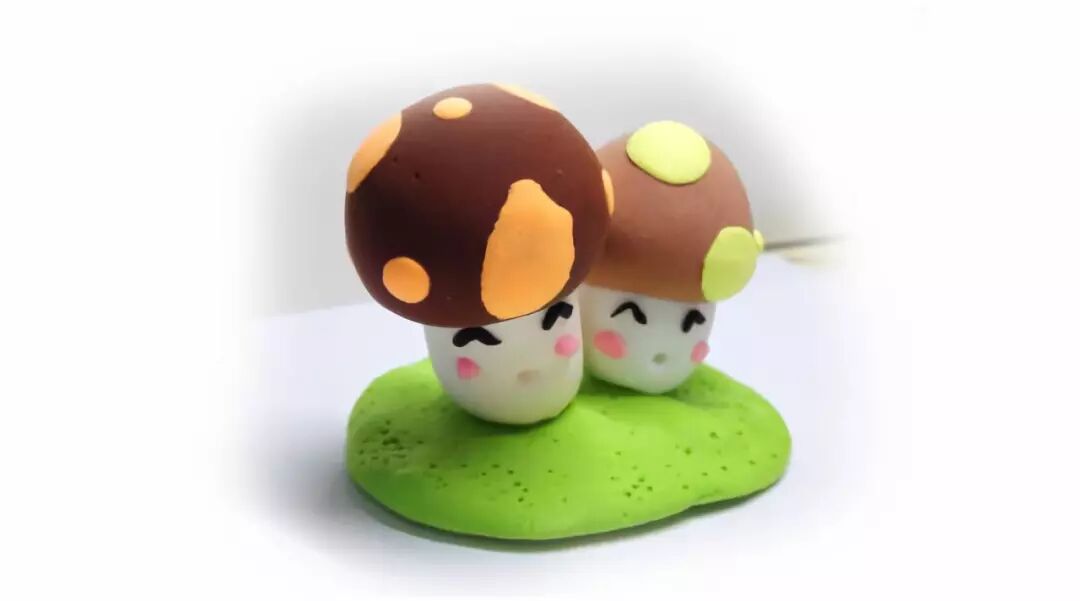
Clay Mushroom Couple
Let's continue making clay crafts. The third project will be two little mushroom couples.

Materials needed: White, black, flesh color, orange, yellow, dark brown, and light brown clay
Instructions:
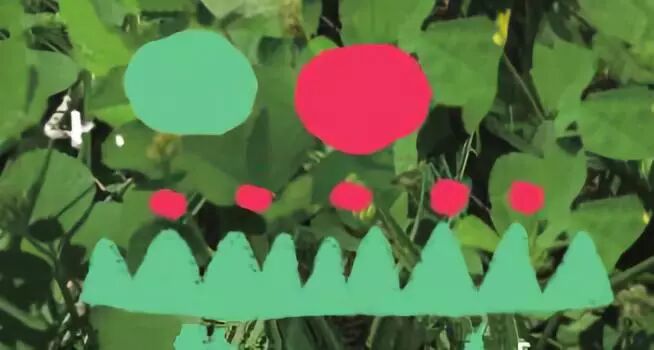
- Take out green clay and roll it into an oval shape, then press it flat. It doesn't need to be particularly regular, but also shouldn't be too thin. This part is used to make the ground under the mushrooms
- Use a toothpick to poke some small holes on it to create a rough texture
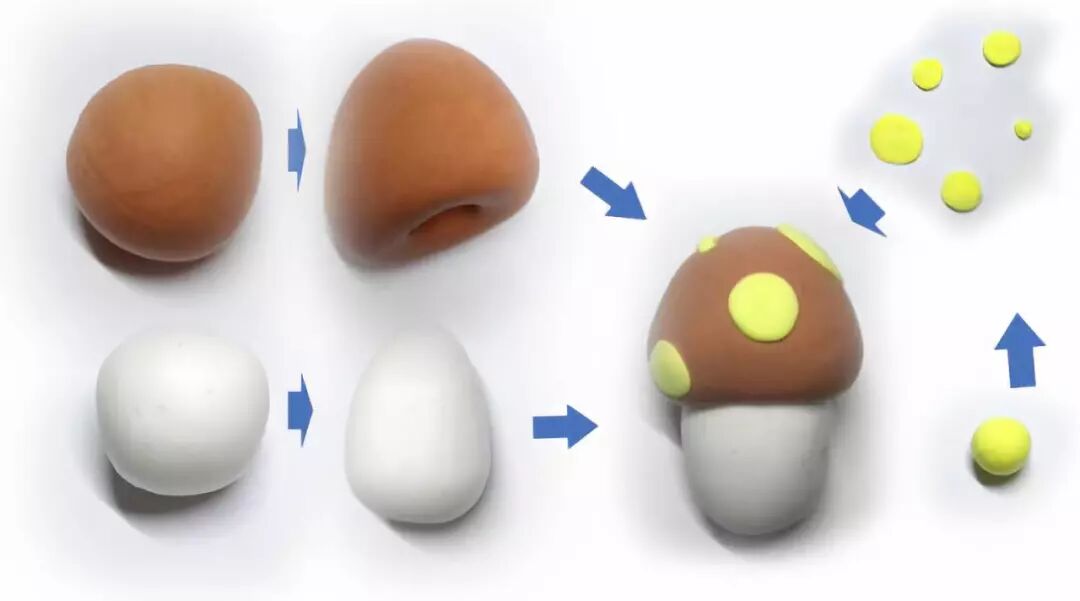
- Let's make the smaller mushroom first. Use white clay to make the mushroom stem; use light brown clay to roll into a water droplet shape, then press one side inward as shown in the picture to make the small mushroom cap. Then connect the two parts
- Use yellow clay to make the mushroom spots. They don't need to be very uniform in size
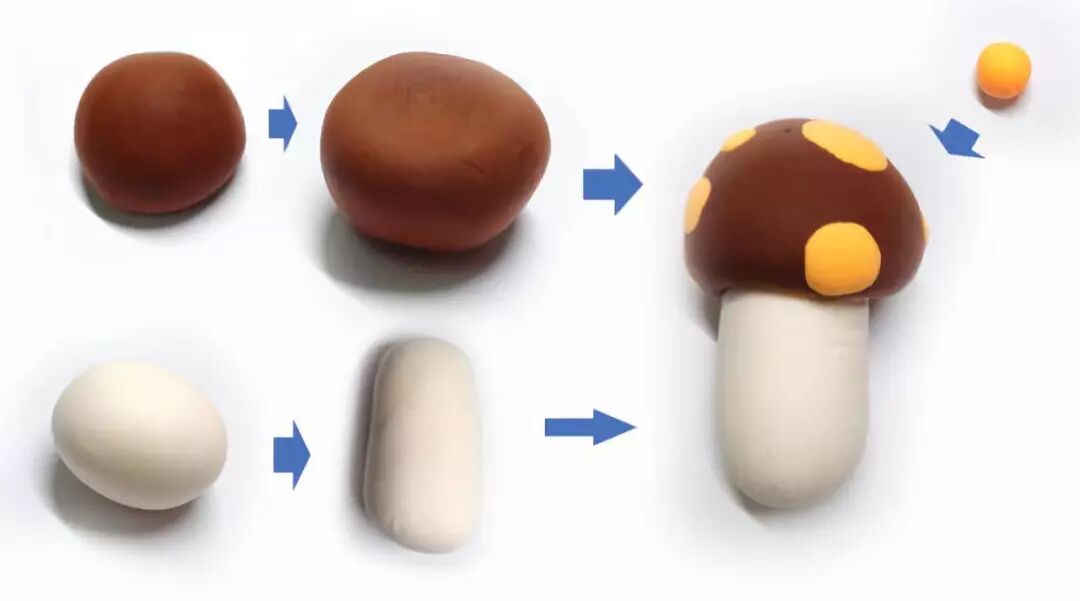
- Now let's make the larger mushroom. Use flesh color clay to make the mushroom stem; use dark brown clay to roll into an oval shape, then press one side inward to make the large mushroom cap. Then glue the small cap to the mushroom stem
- Use orange clay to make the mushroom spots
- Now both mushrooms are done. Let's add some decorations to them. Use pink clay to make two small dots as red cheeks, use black clay to roll into thin strips to make eyes. Look at their backs! 😊
- Finally, adjust the positions of the mushrooms and find a suitable angle
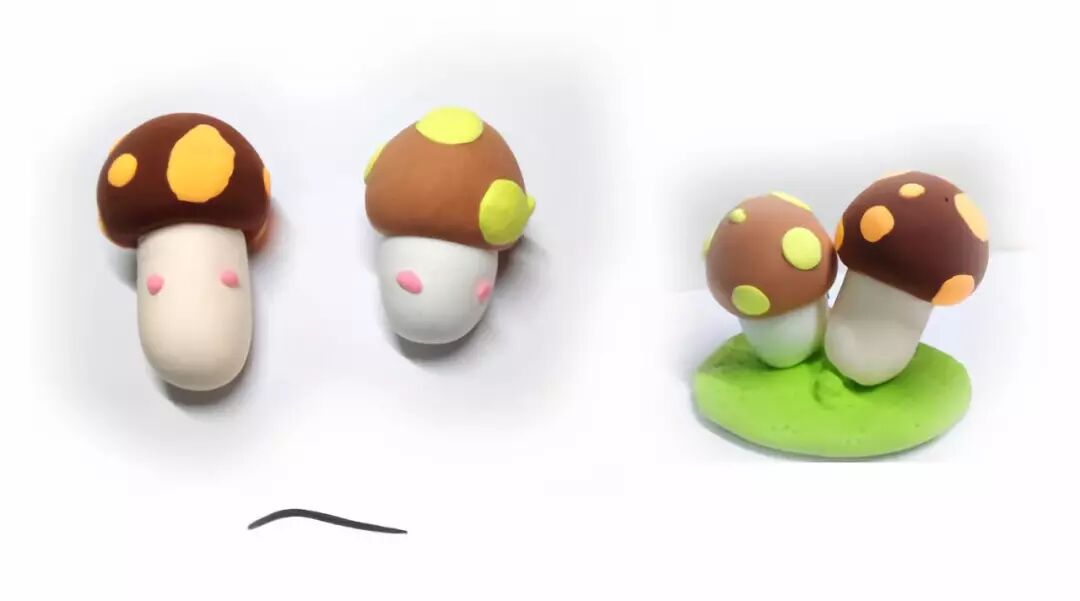
Our little mushrooms are now complete. Aren't they very cute!
Decorated Mushroom House
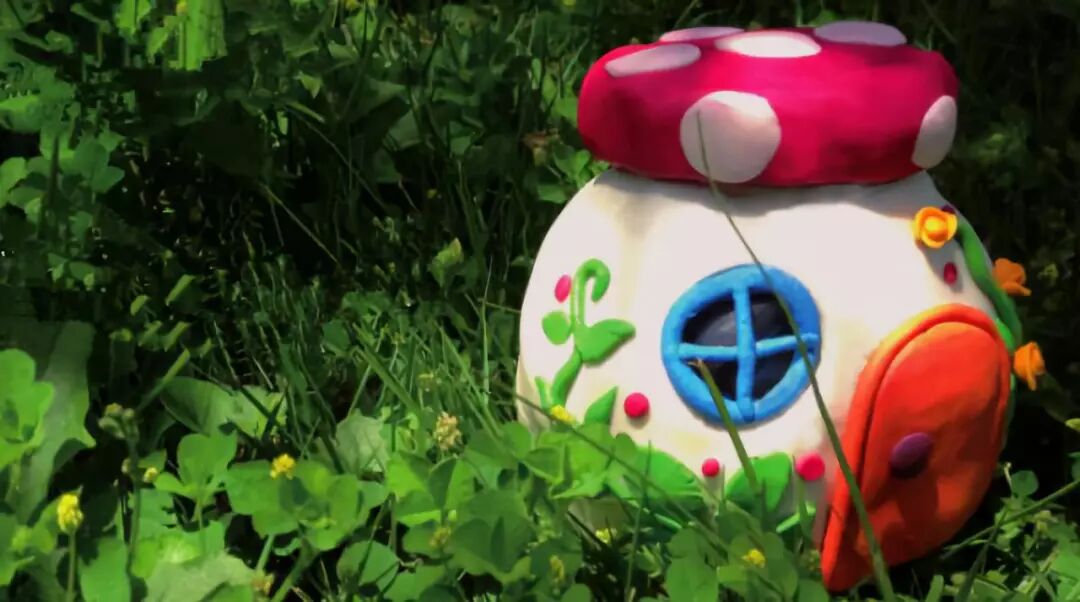
Who lives in the mushroom house? Is it little rabbits, elves, or Thumbelina? You can also build a mushroom house!
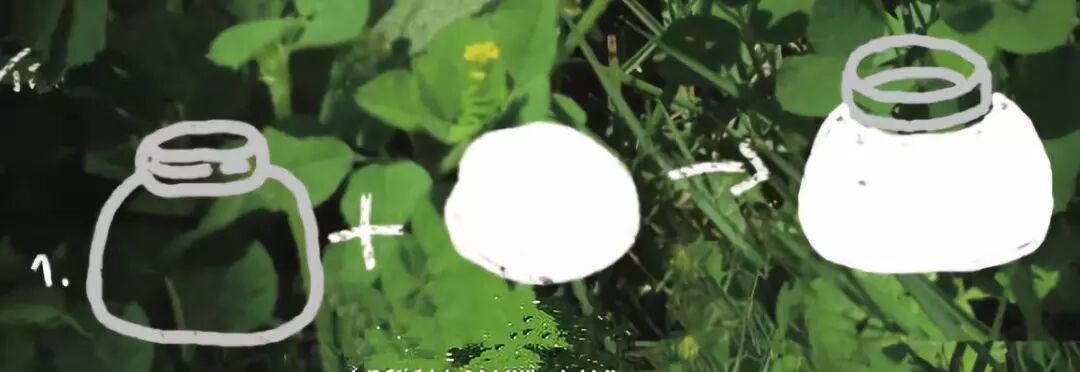
Materials needed: A small bottle with a lid (it really needs to be very small!), various colors of clay (white, blue, orange, red, green)
Instructions:
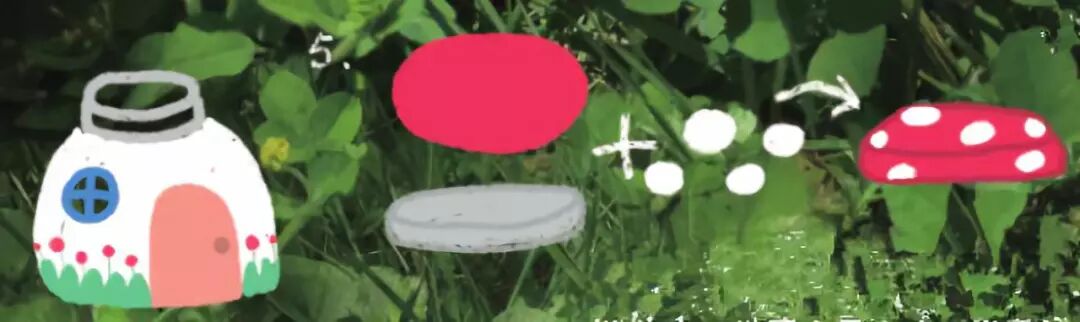
- Wrap white soft clay around the outside of the small bottle
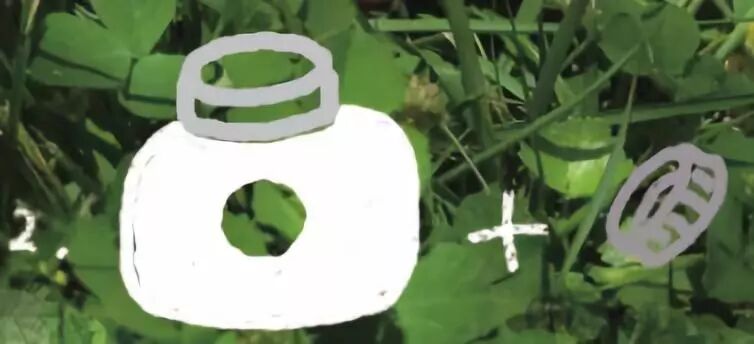
- Use a mineral water bottle cap to press into the side of the small bottle to create a circular indentation
- Take away the soft clay on top and make the small house's windows
- Roll old blue clay into thin long strips and wrap them around the windows once to make window frames
- Use orange clay to press into a door
- Use green and red clay to make a circle of flowers to decorate the small house
- Use red clay to wrap the bottle cap, then use white clay to add dots on top, and the roof is done!
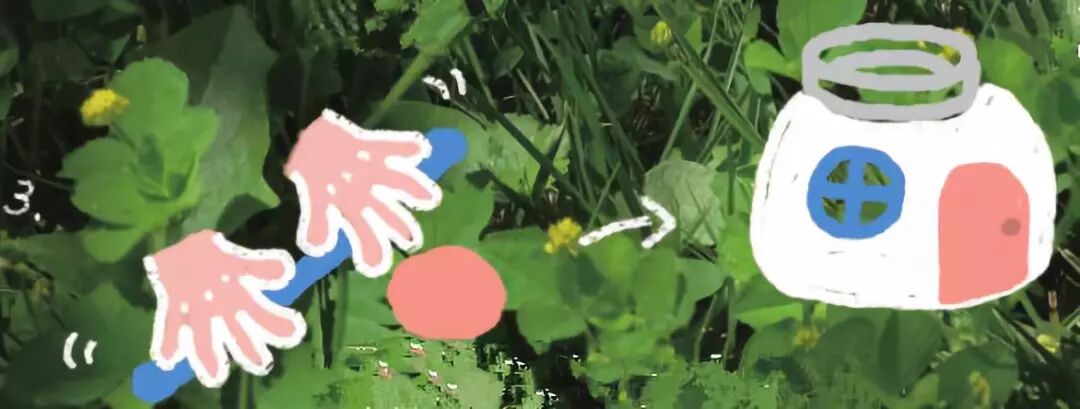
The small house is now complete! Who will live in it?

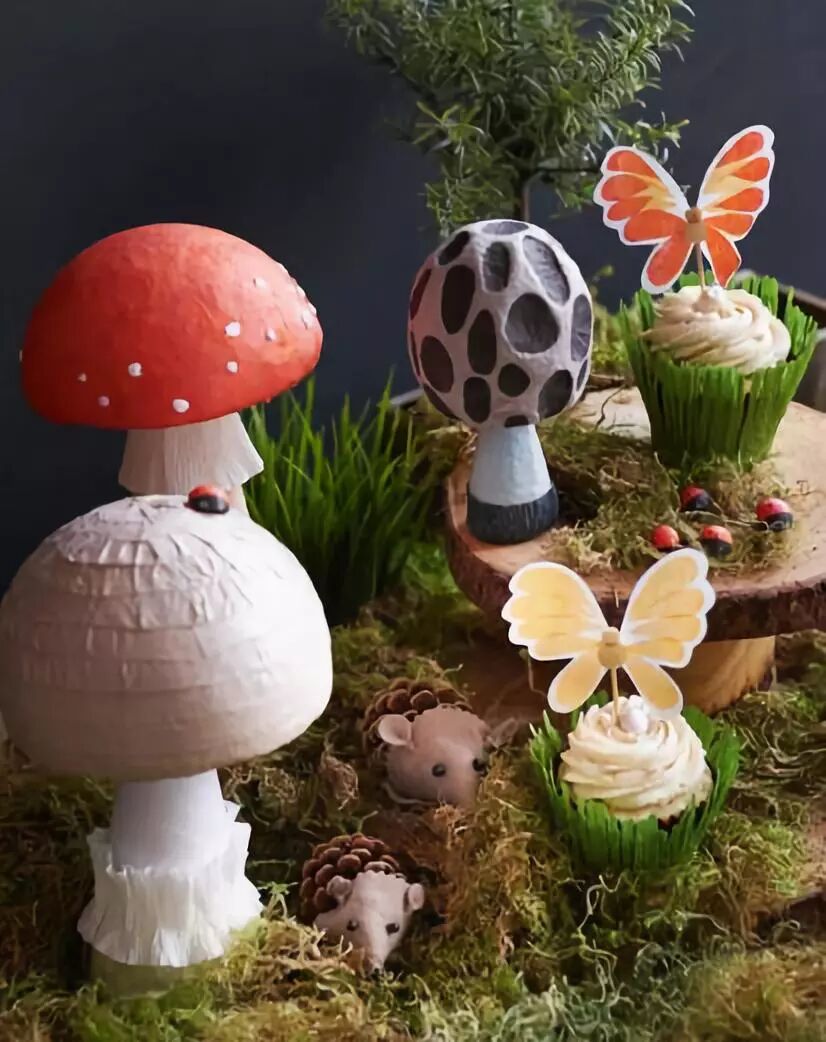
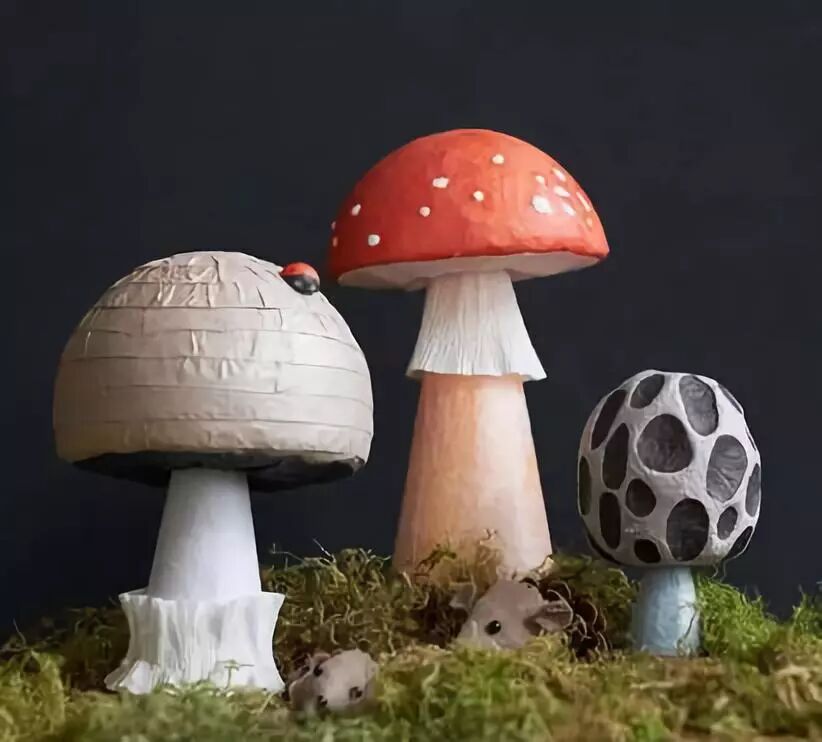
Mushroom Model Decoration
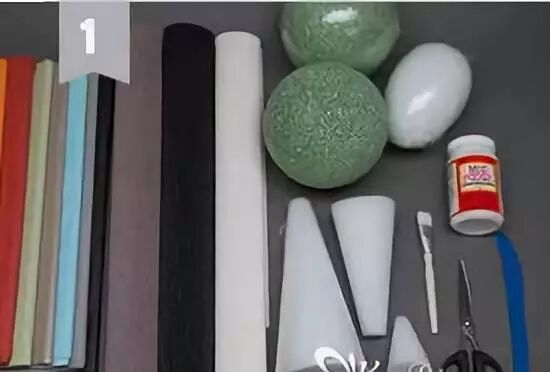
Cute little mushrooms have become essential decorations in various micro-landscapes, green plants, and models. Round heads, round bodies, and bright colors make them very eye-catching in micro-landscapes. Using spherical foam and crepe paper, you can create extremely realistic and beautiful mushroom models by hand.
Materials needed: 180g crepe paper (black, white, gray), colored thin paper (black, red, gray, camel color, light green, orange, etc.), conical foam (9 inches, 6 inches, and 3 inches), 6-inch spherical foam and egg-shaped foam, Mod Podge classic high-gloss craft sealant, scissors, plastic knife, flat brush
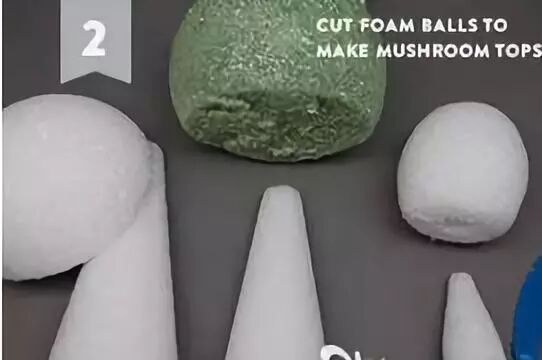
Instructions:
- Prepare all materials, cut off the bottom of the foam ball and trim it to become the mushroom top
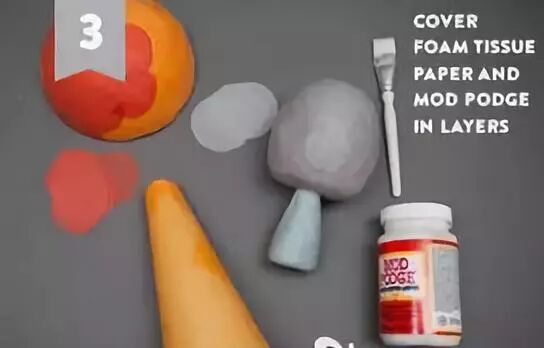
- Use Mod Podge glue to cover the foam surface with cut circular thin paper
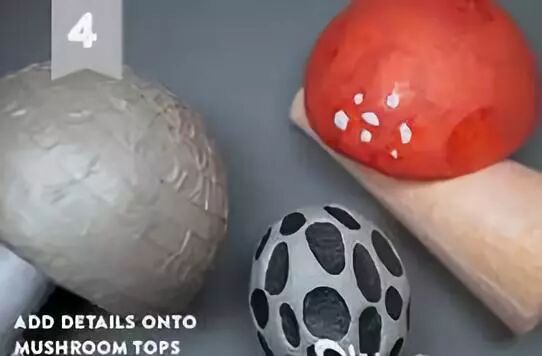
- Add some details to the mushroom top surface, such as painting white dots, etc.
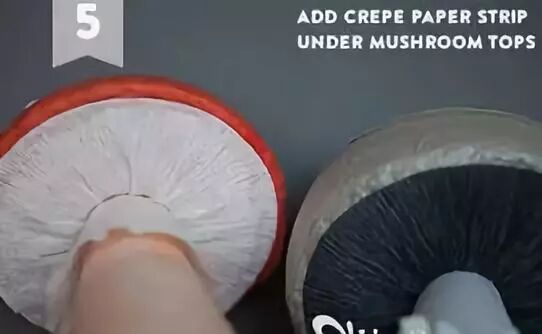
- Add mushroom folds made using crepe paper to the bottom of the mushroom head
- Also use crepe paper to make mushroom folds on the mushroom stem
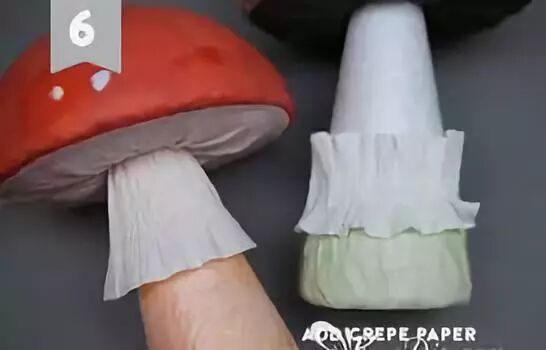
Mushroom model decoration work completed
Paper Cut Mushroom
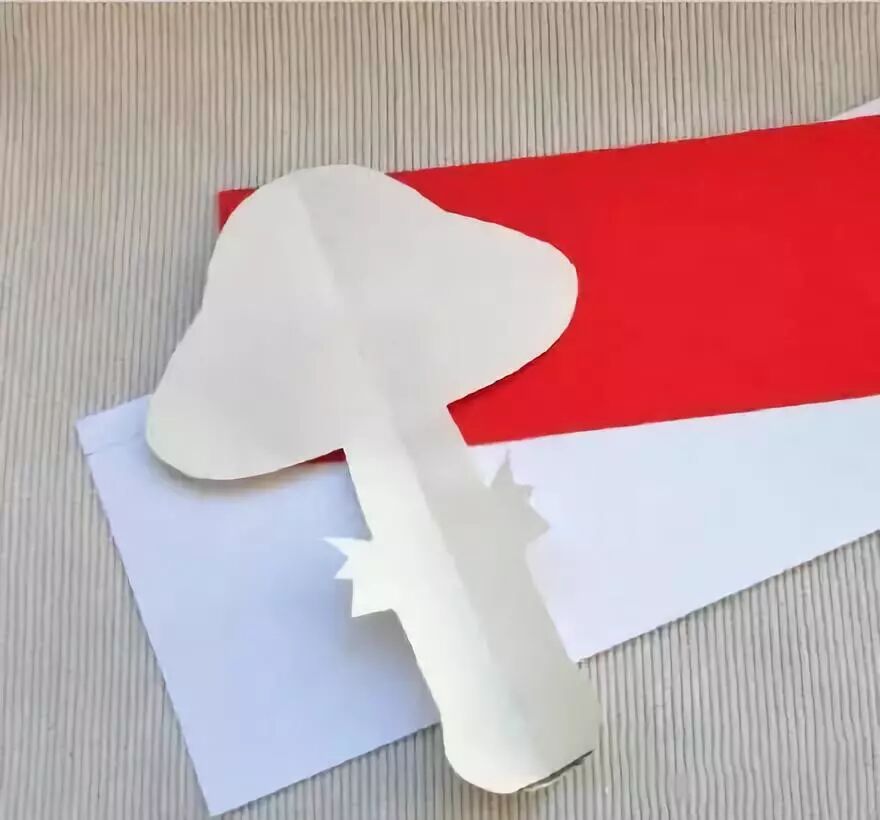
Materials needed: Cardstock, scissors, solid glue
Instructions: Making scissor cuts is relatively simple, you can refer to the steps in the picture below.

Conclusion
These handmade mushroom crafts are perfect for parent-child activities. They're not only fun to make but also help children develop fine motor skills and creativity. The different styles and techniques show how versatile simple materials can be. Which one will you try first?
You May Also Like
4 Comments
David Wang
March 2, 2026 at 4:15 PM
I teach art classes, and these mushroom crafts are perfect for my students! They love working with clay and paper. The mushroom couple project was a big hit - the kids got so creative with the faces and expressions. Thank you for sharing such beautiful and detailed tutorials!
Emma Liu
March 1, 2026 at 2:45 PM
The clay mushroom house turned out so cute! My kids were fascinated by the process and loved decorating it with flowers and vines. It's now sitting on our shelf as a decoration. These crafts are not only fun but also teach children about patience and attention to detail. Amazing work!
Michael Chen
February 29, 2026 at 11:20 AM
I tried the mushroom model decoration project and it was amazing! The foam and crepe paper combination worked perfectly to create realistic-looking mushrooms. My son was so proud of his creation. These crafts are perfect for rainy day activities. Thank you for the detailed instructions!

Lily Zhang
March 3, 2026 at 9:30 AM
These mushroom crafts are absolutely stunning! I can't believe they're all handmade. My daughter and I had so much fun making the clay mushroom house together. The instructions were clear and easy to follow. We're definitely going to try the paper roll mushrooms next!